Saturday, August 7, 2010

Pudding power

You might think that my absence from this blog means my absence from the kitchen. You'd be wrong, but I have a secret shame: I haven't been making cookies. I've been making puddings. And it's not so much shame as deliciousness. And it's secret no longer.


I started out with the idea that I would make a maple pudding, but I'd never made pudding from scratch before at all. So I first picked a very simple recipe:

4 tablespoons arrowroot or cornstarch
2 cups milk or soymilk
pinch of salt
1/2 cup dark maple syrup
1 teaspoon vanilla extract

1. Put the arrowroot or cornstarch into a heavy-bottomed pot, or a microwaveable dish. Slowly stir in the cold milk or soymilk until the starch is completely blended in. Stir in the salt and maple syrup.

2. Cook the pudding over medium heat, stirring constantly until thickened. Alternately, cook it for 3 minutes on high in the microwave, then stir it. Continue cooking it for a minute or two, stirring each time, until thickened.

3. Once the pudding is thick, stir in the vanilla extract. Let cool and chill, in a large bowl or individual serving dishes if preferred.
Unfortunately, here in L.A., the best I could find was grade B maple syrup, which is darker than grade A and recommended for baking, but it didn't give the pudding the real maple kick I was hoping for, although it was still yummy. So then I stepped it up with a more complicated recipe:
1/2 cup cornstarch
1/2 teaspoon salt
1/8 teaspoon ground cinnamon
5 cups whole milk
1 cup firmly packed dark brown sugar
1 quart pure maple syrup, cooked down to 1 cup
6 large egg yolks
6 tablespoons unsalted butter, cut into tablespoons
2 teaspoons vanilla extract

1. In a saucepan, whisk together the cornstarch, salt, milk, & brown sugar until smooth. Place the saucepan over medium heat and bring to a gentle boil. As it starts to get close to a boil, start whisking constantly. Remove the pan from the heat.

2. In a medium bowl, whisk the yolks until smooth. Quickly whisk about 1 cup of the hot milk mixture into the eggs, and then quickly whisk this egg mixture into the saucepan of hot milk.

3. Cook over medium heat, whisking constantly, until the mixture comes to a boil. Continue to boil, whisking constantly, for about 5 minutes. Remove the pan from the heat and whisk in the butter pieces until completely melted. Whisk in the vanilla & maple syrup.

4. Pour into ramekins and let cool to room temperature before covering and chilling.

5. Before chilling, place plastic directly on top of the pudding to avoid a pellicle from forming (tough skin surface). Chill overnight.
This pudding was much richer and had a more interesting flavor, without being particularly difficult to make. I didn't boil down a quart of syrup, however, and I probably should have, because the grade B syrup didn't really cut it here either. If you're going to make a maple pudding, I recommend this one, with the darkest syrup you can find if you don't do the boiling, and also double the cinnamon. Maple extract might also work here.

I then turned my attention to a coffee pudding. I chose this recipe, but ended up making some changes even before my first batch.
1/2 cup (packed) golden brown sugar
3 tablespoons cornstarch
3 tablespoons instant espresso powder
1/2 teaspoon ground cinnamon plus additional for sprinkling
2 cups whole milk
1 1/4 cups chilled heavy whipping cream, divided
1 tablespoon Kahlúa or other coffee-flavored liqueur

1. Whisk first 3 ingredients and 1/2 teaspoon cinnamon in heavy medium saucepan. Whisk in milk and 1 cup cream. Bring to boil over medium-high heat, whisking constantly. Boil 1 minute, whisking constantly. Divide among 6 small bowls. Cover and chill until cold, about 4 hours.

2. Whisk 1/4 cup cream and Kahlúa in small bowl until peaks form. Spoon atop puddings; sprinkle with cinnamon.
I wasn't attached to the Mexican aspect of this recipe, so I used Bailey's Irish Cream instead of Kahlúa. Also, having been disappointed by the lack of flavor in the maple puddings, I used half again as much espresso powder (4 1/2 tablespoons). This resulted in what can only be described as espresso pudding. It has a very intense coffee flavor and isn't too sweet, which we love in this household but might not be great for all occasions (like for kids).

The second time I made it I added some more sugar to offset the extra coffee, about an extra 1/3 cup, but I might increase that next time. I also doubled the cinnamon in this recipe as well since that flavor got a little lost. Finally, some extra cornstarch will help this recipe set a little better. This is now the favored pudding in my household and I'll probably make some more this weekend.

(By the way, I love the pellicle. I would eat a whole bowl of pudding skin. But my husband isn't a fan, so I just put plastic wrap on half of the ramekins and leave the rest to develop their skins. Also I think pudding just looks nicer with the skin on it, but here's a picture for you to decide for yourself.)

Sunday, April 11, 2010

Cookie Basics and Improvisation

For those of you who are not seasoned cookie baking veterans, I thought I'd share a basic drop cookie recipe, which can serve as a great launching pad for creating all sorts of deliciousness. Write down this recipe, commit it to memory, save it on your computer, etch it into a stone tablet, or write it on the wall in blood (no, actually, don't do that. ew.)

Basic Drop Cookie Dough

1 cup butter
3/4 cup white sugar
3/4 cup brown sugar, packed
2 eggs
1 tsp vanilla extract
1 tsp baking soda
1 tsp salt
2 1/4 cups flour

Preheat oven to 375ºF. Cream butter and sugars. Add eggs and vanilla, mix until creamy. Mix in baking soda and salt, then gradually work in the flour. From here, you can add whatever baking chips, nuts, dried fruits, etc that you want.


More advanced bakers can experiment with things like oatmeal and cocoa, but usually you'll want to reduce the amount of flour a little if you do this. You can even split your dough into several batches and make multiple types at the same time. Using two spoons or a schmancy cookie scoop, drop dough onto cookie sheets.


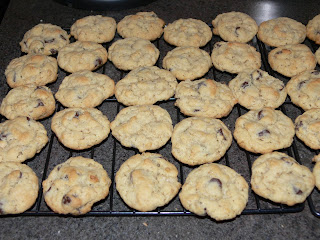
Bake 6-8 minutes, until they reach your desired state of done-ness. I like to take them out while they're still doughy and let them finish baking on the counter. Cool on a clean countertop, or a cooling rack, if you have one. Here is another matter of preference: A wire rack will create crispier cookies, while the countertop will produce softer ones. (Confession: I used a rack this time because I was too lazy to thoroughly clean the counter. So sue me.)


This time, I did two flavors: Cinnamon Walnut (Hershey's cinnamon chips and chopped walnuts) and Classic Toll House (semi sweet chocolate chips and walnuts). In the past, I've done things like M&Ms, Andes Mint chips (with some cocoa added to the dough), chocolate dough with white chips; the possibilities are endless. Enjoy!

Wednesday, March 31, 2010

Cheddar Cheese Cookies

When I lived in San Francisco, I loved to bring these savory cookies to parties. They're easy to make, unusual, and delicious. Unfortunately, since then I've lost the recipe I used. I'd been thinking for quite a while that I needed to try again, and my name on this cookie blog gave me the impetus I needed.

First I searched for a recipe that I thought resembled the one I used to have. I found a nice simple one from What's For Dinner?:

Ingredients

1/2 lb grated sharp cheddar cheese
1/4 lb butter, softened
1 1/2 cups flour, sifted
1/2 teaspoon salt
1/4 teaspoon paprika
3 teaspoons water

Directions

Cream cheese and butter. Add dry ingredients and water. Refrigerate for one hour. Roll into balls and flatten to 1 inch thick on baking sheet. Bake on ungreased cookie sheet at 350 degrees for 15 minutes.

Notes

1. Back in the day, I had no kitchen equipment, so I did everything by hand, including creaming the butter and cheese. Because I was trying to recreate that first recipe, I did the same thing this time, including mixing the dough. The creaming is easier than it sounds and can be done in front of the TV. Just be sure you really let the butter soften (not melt) before you go at it with a wooden spoon. Also, I really like that moment when you're stirring clumps of ingredients that refuse to play nice, and then all of a sudden it just resolves into dough. That said, I have a lot of time on my hands.


2. I also grate the cheese myself. The recipe I had specified that it be grated fresh, so I've never tried it with the bagged, pre-shredded kind. The very light texture of freshly grated cheese makes it cream into the butter really well, but if you're using a food processor you could probably use the other kind.

3. I hate sifting. I think in a previous life I must have lost a limb or a spouse to some kind of violent sifting accident. Or I'm just lazy. Either way, I simply under-measure the flour a little in recipes like these where it doesn't really matter, run a fork through the lumps, and it works out fine.

4. After you've rolled the dough into balls, flatten them gently with the tines of a fork, and then again perpendicular to the first press, to make a cross-hatch pattern that will give the cookies a nice texture when they're baked. I prefer parchment paper for this.


5. Anyone in the house who really likes cheese is going to become extremely eager for a taste of these cookies, especially if they happen to smell the dough on you.


6. I found 15 minutes was enough to bake the cookies thoroughly, but on the second batch I added 5 minutes, which browned them a bit more without sacrificing any of the texture.


7. I was fooling around with different sizes of cookie so this recipe yielded 33, but you could easily make more if you have the patience to roll smaller dough balls. And since they're insanely rich, this is a good idea.


Final verdict


I definitely recommend this recipe. The cookies came out flaky on the outside and moist on the inside, very much like my old recipe. XpresoAdct declared them "Cheez-Its in cookie form." Next time I might try extra-sharp cheddar, and I would probably double the paprika, which I like when you can see it in the cookies. I usually recommend dipping them in salsa, but we discovered that they are sensational with barbecue sauce as well.

Sunday, March 28, 2010

Oatmeal Chocolate Chip Cookies!

Despite my deepest craving for more Chocolate Chip Cookie Dough Truffles, I decided I would be a good little blogger and actually make cookies for the cookie blog. The amazingly delicious and supremely addictive cookie dough truffles will have to wait, even if it's just 24 hours.

So today I present to you with a classic recipe that no kitchen should be without: Oatmeal Chocolate Chip Cookies!

Now before I get to the recipe, I must share a secret or two. Despite the fact that I have known for at least a month now that all of my brown sugar has dried up and gone hard, I continually keep forgetting to save it and make it soft again.

Make it soft again, you say?

Why yes, you can save your brown sugar! It goes like this: simply put a slice of fresh bread in with your brown sugar overnight. Revisit in the morning, and proclaim with shouts of joy that your brown sugar is baking worthy again.

But Robyn, what if I'm like you and I've already started creaming the butter before realizing that my brown sugar is no good?

There's an immediate solution for that too! For each cup of brown sugar you had needed, subsitute it with a cup of granulated sugar and one tablespoon of molasses. The molasses will smell a bit of strong, but I promise that once all of the ingredients are mixed, there's no taste difference at all.

****

Ingredients:
1 cup softened butter
3/4 cup white sugar
3/4 cup brown sugar, packed
2 eggs
1 teaspoon vanilla
2 cups all purpose flour
2 1/2 cups oats
1/2 teaspoon salt
1 teaspoon baking powder
1 teaspoon baking soda
2 cups chocolate chips

Directions:
Preheat oven to 375 degrees F.

In a large bowl, cream together butter and sugars. Beat in eggs one at a time, then stir in vanilla. In a seperate bowl, mix together flour, oats, salt, baking powder and baking soda. Stir dry ingredients into creamed butter and sugar. Add chocolate chips.

Drop by round teaspoon onto ungreased cookie sheets. Bake for 9-12 minutes, depending on the size of your cookies.

****


Feel free to doctor these cookies to your liking. Add more or less chocolate chips (I use -gasp- only about 1 cup), use different kinds of chips, add some nuts, raisins, etc. Most importantly, eat copious amounts of raw cookie dough and lots of straight-from-the-oven-cookies.

Tuesday, March 23, 2010

Adventures in Baking: Tim3P0 Learns Cupcakes!

So, I know this is supposed to be a cookie blog. But it was just a cupcake kind of a night around here. My lovely husband is on a quest to learn to cook and bake more proficiently, so tonight we made Nutella Swirl Cupcakes. We tweaked a recipe we found online, and picked out a frosting we found paired with a different cupcake recipe.

As we began mixing, it became clear that this recipe required some adjustment. The batter seemed much too thick, so I consulted a few other cake recipes, and decided to add some milk. It also turned out that the yield of 10 cupcakes was a vast underestimation. We did 12, and some of those were overfilled. I'd say it would be safe to expect about 18 cupcakes from this recipe. Also, they took longer to bake than the recipe suggested (this may be due to the overfilling). Our amended recipe follows:


10 tbsp butter, softened
3/4 cup white sugar
3 eggs
1/2 tsp vanilla
1 3/4 cups flour
1/4 tsp salt
2 tsp baking powder
1/2 cup milk
Nutella, approx. 1/3 cup


Preheat oven to 325F. Line 18 muffin tins with paper liners.
Cream together butter and sugar until light, 2 minutes. Add in eggs one at a time, until fully incorporated. Add vanilla. Stir in flour, salt and baking powder until combined.

Fill each muffin liner with batter. Fill about 3/4 full.
Top each cake with 1 tsp Nutella.

With a toothpick, swirl the nutella into the cupcake, folding it into the batter.

*note: A self respecting chef never wastes perfectly good batter ;)


Bake for approximately 30 minutes, until surface is resilient and a toothpick comes out relatively clean.

Set the muffin pan on the stovetop to cool, unless you're feeling particularly fancy, in which case you can use a wire rack or other schmancy cooling device.

After they've cooled awhile, make your frosting. We took ours out of the oven just as Craig Ferguson came on, and started the frosting after he read emails and tweets (assmöde). Incidentally, we are both very geeked to see the robotic fruit of Grant Imahara's labor in a few weeks, but I digress.

Ahem.

Back to the frosting.

The recipe we found said it was a bit generous for a dozen cupcakes, so went with a 3/4 recipe. It was still too much for 12, but I think it should be just about perfect for 18, so I will give you the amounts we used. Also, we substituted milk for the cream (not for any caloric reasons; we just didn't have any cream in the house).


3/4 cup confectioners' sugar
2 1/2 tablespoons butter, at room temperature
1/2 teaspoon pure vanilla extract
1/4 cup heavy cream (or milk)
toasted hazelnuts for garnish (optional)

Combine all ingredients except cream/milk and garnish. Mix on low speed until creamy. A paddle mixer is probably best, if you have one, but we used a regular old hand mixer and it worked just fine. Add the cream/milk and mix on high until smooth and velvety.

This is a really beautiful frosting.


Frost and garnish as you see fit.

Now it's time to nom some cupcakes, beyotches!
See you next time, when maybe we'll actually make some cookies, you know, for this cookie blog :)


Monday, March 22, 2010

Welcome to the Cookie Club

First rule of Cookie Club: No talking about Cookie Club.

Okay, that's a lie.

 I had this idea for two reasons:

1) I love cookies

and

2) I love baking cookies.

So this blog exists for the sharing of cookie recipes and adventures. There will be other contributors than just me posting (I hope), so except some delicious and varied recipes!

Love,

Jill
    
(this is not a cookie, but it is delicious)